Drumulator
Drumulator Overview

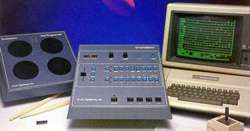
The $995 Drum Machine The early 1980's saw the rapid introduction of digital drum machines from Linn and Oberheim. These new machines offered unparalleled programming and real samples rather than analog approximations. But they were expensive.
E-mu Systems, fresh from developing the Emulator I, saw an opening in the market and introduced a basic sample based drum machine but at a magic, under $1000 price. It worked, it sounded good, and it sold by the bucket load (at least 7000 units). This was a major success, and when coupled with the EII, it transformed E-mu Systems from a small to medium scale manufacturer. The Drumulator was born in early 1983, and it sold very well for a year until the Oberhiem DMX came out.
Dirty Dozen The Drumulator has 12 sounds; bass, snare, toms hi, toms mid, toms low, clave, cowbell, hand claps, hi-hat open, hi-hat closed and cymbal (ride). These sounds play through 8 voice channels. Two of the channels are unfiltered (hi-hats, cymbal), four channels go through selective filters which pick out the right frequencies, and the remaining two (the toms) use dynamic VCF's.
Hit the Beat The Drumulator has good programmability in real-time , but no step time capability. There is auto-correct, swing, independent volume and accent control, as well as looping within a song.
Where's the compromise? The development team knew how to build good sample replay electronics, but to keep the costs down they had to keep the sample memory down to just 64k bytes ! That means 8-bit samples and very short sample times, for the 12 drum sounds. The team also decided on only 4 drum front panel buttons, rather than 12. This means a lot of button pushing !
As with many early drum machines there is only one DAC, which is multiplexed across all the voices. This compromise could never be made on an Emulator, but early Japanese samplers did the same, it was not just drum machines that had to cut costs.
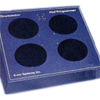
 Pad Programmer This external 4 pad in a box controller enables you to play the Drumulator in real time with ordinary drum sticks. Each of the Programmer's pads can be assigned to any Drumulator sound and each is touch sensitive, allowing you to choose the normal or accented version of a sound by how hard you hit its pad. The Pad Programmer includes inputs for processing external controllers, as well as four trigger outputs for controlling synthesizers, sequencers, or other drum machines. more »
Emulator E-mu Systems could even tell you how to use an Emulator and a computer to create your own custom Drumulator sound chips.
 The Graphic Rhythm Composer (GRC) The GRC is a software system for the Apple II/IIe that connects to the Drumulator's RS232 interface. It let's you create rhythm patterns on an interactive graphics display. You can then link these patterns together into complete songs, save them on floppy disk, and print them out for future reference. You can independently program the level of each individual note. The Apple needs at least 48k bytes (64k bytes preferred) of memory (gulp!), one 5.25" disk driive and a 2 axis joystick with 2 buttons.
New Sounds E-mu Systems provided a new EPROM chip for owners who wanted to replace the standard ride cymbal with a crash cymbal. This was a user install (the first and last time that E-mu Systems encouraged you into their machines for some years !).
Upgrades & Add Ons
Overview The Drumulator has long since been unsupported by E-mu Systems, so you will need to scan second hand adverts and eBay to get any upgrades to the Drumulator.
New Sounds For a few years in the mid 1980's EPROM based drum machines ruled the market, as memory was too expensive to allow lots of long samples to be stored. Drum machines came with a fixed set of 10 to 30 sounds, which users soon wanted to replace. This was possible by buying a new sample chip, opening up the drum machine and replacing one or more of the existing chips.
However the Drumulator is not the easiest of drum machines to upgrade with EPROM's, as 11 of the sounds are spread over 3 chips. Only the crash cymbal has its own EPROM.
Factory Sounds E-mu Systems provided a replacement crash cymbal EPROM to enable the rather dull ride cymbal to be replaced.
Switched On JLCooper went as far as producing a custom modification that enabled both the ride and crash cymbals to be fitted internally. A toggle switch was used to select the active sample.
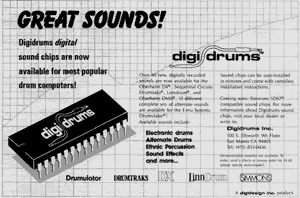
 Digidrums Today's mega company Digidesign started out manufacturing EPROM drum chips - as Digidrums. They produced a wide range of drum sets for the Drumulator, Linn Drum, Oberheim DMX/DX and Simmonds. The sets completely replaced the factory chips, and cost around $40 each. At least 15 Digidrums sets were created for the Drumulator, the known sets are:
- Simmonds One
- Simmond's Two
- Latin Percussion
- African Percussion
- Heavy Metal Drums
They contain between 8 and 12 samples. A demonstration tape was available from E-mu Systems, Digidrums or the dealers. Hey, any one still got one we can listen to ?
The Digidrums sound ROM's also included the 64 voice song upgrade.
RS232 The Drumulator RS232 interface protocol is very simple, with 8-bits being used to communicate volume (16 levels) and the drum sound to be played.
 Pad Programmer Feel the need to play the Drumulator with real sticks ? Well you can with the Pad Programmer. It provides four black, round pads on a separate grey unit, the same size casing as a Drumulator that plugs into the gate inputs of the Drumulator. The pads are touch sensitive, and generate 5V gate outputs, which can be hooked up to other drum machines or even modular synths. An external AC adapter came with the Pad Programmer.
OS Versions The latest version of the Drumulator Operating System is 3.0. The OS version number can be checked by pressing the MEM and CASSETTE keys together. The LED will display the OS version number as Px.xx (e.g. P3.00). The Drumulator OS was upgraded via an EPROM swap out.
OS Version 2.0 This version was released in May 1983 (actually signed off by the Chief Wizard - Dave Rossum on 10th May 1983). It provides a very welcome 64 Songs, rather than 8, as well as a song edit mode. The program ROM size was not increased, so the extra functionality was gained by a bit of rewriting to economise on memory. A bug in song mode was fixed too (where a continuous loops of no segments locked the drum machine). The upgrade was $35.00
 The Graphic Rhythm Composer (GRC)
This Apple II/IIe software provides non-realtime programming of measures and songs, with individual note volume control. The Apple computer is connected from its standard RS232 serial port to the Drumulator via its Clock/Cassette jack input, with a special cable. The interface is 8-bit serial at 9600 baud
The GRC software has 4 modes:
- Measure Writer: Where the joystick is used to move the cursor around a measure of music, placing notes and setting the volume (15 steps). Measures can then be played, edited and stored to diskette.
- Segment Writer: This mode enables existing measures to be linked together to form the segments within the Drumulator.
- Song Writer: This mode links segments and measures into songs. Songs can be saved to floppy disk.
- Song Player: This mode plays the actual songs back via the Drumulator.
Interfacing
Overview In the days before MIDI it was a challenge to interface different drum machines and sequencers. However it could be done, sometimes with a bit of electronics adapting.
Sequential Circuits The Poly Sequencer and the sequencer in the Prophet 10 could be driven by the Drumulator's clock out being hooked up to the sequencers clock in.
The Pro One's arpeggiator can be driven from the Drumulator by connecting the Drumulator trigger out to the Pro One's ext clock input.
The Prophet 600's arpeggiator can be driven by the Drumulator. Connect the metronome output of the Drumulator to the Prophet's control switch jack. However you need Drum Mod 0.1 to widen the trigger pulse from the Drumulator from 1 to 10ms.
Roland You will need a special adapter cable to hook into the Roland 5 pin DIN sync connectors. This needs to provide both clock and run/stop signals. Connect the clock out of the Drumulator to pin 3 of the Roland DIN connector. Connect a foot switch (normally open) to a "Y" cable. Connect one end of the "Y" to the run/stop jack on the back of the Drumulator, and the other end to pin 1 of the Roland DIN connector. Connect grounds to pin 2. This set up will work with the TR606, TR303, TR808 and MC4.
The Jupiter and Juno synthesizers can have their arpeggiators synchronised, by connecting the trigger output of the Drumulator to the external clock in of these synthesizers. But you do need Drumulator Drum Mod 0.1
Linn The LM-1 runs at 48 pulses per quarter note., so it has to be the master clock. Connect the Internal Clock Out of the LM-1 to the External Clock Input on the Drumulator. Set the external clock divider on the Drumulator to 2. Set Auto Correct on the LM-1 to HI.
The Linn Drum is hooked up by attaching its Tape Sync Out to the Drumulator's External Clock Input, with the external clock divider at 2.
Oberheim The DMX and DX use 96 pulses per quarter note, so they must be the master clock. Connect the Clock Out of the DMX or DX to the External Clock In on the Drumulator, and set the external clock divider to 4 on the Drumulator.
The DSX sequencer has too narrow a clock pulse for the Drumulator to accurately sync to. A timing circuit has to be inserted - details of this are unknown.
Early Serial Number Fix If you have a Drumulator before serial number 2500 and you are driving Roland kit, you will need to replace capacitor C74 with a jumper to help the sync.
Drum Mod 0.1 Some synchronization has to be done with a wider trigger pulse from the Drumulator, this is Drum Mod 0.1. Remove C75 and replace with a jumper, then use a toggle switch to selectively add in a further 0.2uF of capacitance across C76. When the extra capacitor is switched in the pulse width increases ten fold to 10 ms
External Computer Control
Overview The Drumulator can be completely controlled via an external computer by hooking up the computers RS232 port to the CLK/CASS IN jack on the Drumulator. This is a 9600 baud 8 bit serial interface. It was provided for "hobbyists" (read propellor heads !!) to hook their Apple computers up to the Drumulator. Remember this was in pre-MIDI days, when very few electronic instruments could inter work.
Entering a New Universe Press and hold the EXT CLK button, the display will read EC 01 (or something similar), then press RUN/STOP. The Drumulator will appear to die - all the LED's will go out. This is due to the Z80 micro processor being too slow to cope with scanning the front panel, and working with the incoming RS232 data. To get back out, press ENTER.
Pin Out The RS232 cable should be wired up as follows:
| RS232 Pin | Name | Drumulator Connection |
|---|---|---|
| 1 | Protective Ground | No connection |
| 2 | Serial Output | Clk/Cass IN |
| 3 | Serial Input | No connection |
| 4 | Request To Send | Connect to Clear to Send on the RS232 |
| 5 | Clear to Send | Connect to Request to Send on the RS232 |
| 6 | Data Set Ready | Connect to Data Terminal Ready |
| 20 | Data Terminal Ready | Connect to Data Set Ready |
| 7 | Signal Ground | Connect to shield ground |
Data Format The external control data format is in 8-bit serial data at 9600 baud, with zero at -12V and 1 is +12V. Two stop bits are needed between each data byte to give the Z80 time to fire the sample. Each data byte instructs the Z80 to play one of the 12 drum samples at a certain volume. The sound is initiated during the stop bits. The most significant 4 bits control the level, and the least significant control select a drum sample, including the metronome click.
Call Marketing! The manual describing this feature surprisingly asks any user who has created an interesting program to call the marketing department !
The Graphic Rhythm Composer In fact you could buy a drum pattern sequencer for the Apple II/IIe to control the Drumulator. This software enables non-real time programming of measures and songs, with total dynamic control on a note by note basis. The GRC comes with a program diskette and an interface cable. An Apple computer with at least 48 KB of memory is required (64 KB preferred), one disk drive and a two axis joystick (!) to control the cursor.
There are 4 modules in the GRC. A Measure Writer which enables notes to be entered on screen, complete with volume levels. It hold s this notes in segments. The Segment Writer links the measures together. The Song Writer links the segments into complete songs for storage on diskette. And finally, the Song Player actually plays back the programmed songs.
This is all pretty cool ....
MIDI Manual
So you have Drumulator with MIDI but you have no idea how it works ... Turn on the Drumulator. Press and hold EXT CLK. The display now shows EC XX, where XX is the midi channel 01-16. Press < and > buttons to change MIDI channel to what you want. The Drumlator samples are assigned around C1, on individual keys. 15 levels of touch sensitivity. There is no MIDI out or MIDI clock sync. You can make up or buy on ebay a MIDI sync to Drumulator interface.
Repairs
Overview The Drumlator is on quite a reliable drum machine, with few mechanical parts and a robust electronic design. The main problem areas are the PSU, the LCD and sliders and buttons.
Warning Please only attempt a repair yourself if you are competent at servicing electronics, use a service centre if in doubt. The Drumulator is easily damaged or the case melted by amateur attempts at repair.
 Missing or Damaged Slider Knob The Drumulator has one slider knobs which can be easily lost or damaged. They are available from Farnell (part number 766756).
 Missing or Failed Small Push Buttons The Drumulator uses a small momentary push button for most of the controls. After 15+ years use they are beginning to wear out and even with cleaning still don't work immediately. They are easily replaced with new buttons made by E-switch and are available from Digikey in the USA (blue: EG2556-ND, red: EG1325-ND, black: EG1321-ND). A full set of buttons will cost around $50, and you can choose from a range of cap colours to customise your Drumlator. You will need to desolder the old buttons carefully.
Large "Pad" Buttons Replacements can be bought for US$11 from EPR Electronics in the USA.
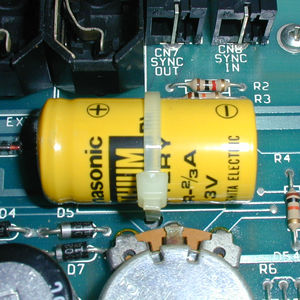
 BatteryThe Lithium battery in the Drumulator will fail after 5 years. To replace it you need a Panasonic Lithium 2/3 A 3V battery with tags - part number BR-2/3AT-2SP. Digikey in the USA stock them (p/n: P201-ND).
Potentiometer Replacement The Drumulator uses two front panel potentiometers which tend to grind a bit after 15 years use. They can either be cleaned or better still replaced by a higher quality 10k Log potentiometer. We use nice Bourns Conductive Plastic models with new knobs.
Power Supply The power supply is getting old by now and failure is not uncommon. One of the rails may go out of specification. Replacement PSU's are not available, so the best option is a service centre repair, especially as its not a separate unit but built into the main PCB.
Technical Description
Architecture The Drumulator uses a single Z80 microcomputer to sequence notes, scan the controls and reproduce 8 bit drum samples held on EPROM's. The Z80, running at just 2.5MHz, has its own dedicated program 64k bit PROM, which is loaded at power on. The display is made up of two 2 digit LED's.
Song Memory The Drumulator stores the segment, song and mix data on to two battery backed 6116 CMOS chips, this provides just 4kbytes of storage.
Sound Memory The Drumulator has 4 x 16k byte ROM's (93128's) providing a total of 64 KB of sample memory (half the size of the Emulator I's memory). One ROM is dedicated to the cymbal, the other 3 hold the remaining 11 drum samples, all at 8-bit resolution, and in no particularly logical order !
OS Versions The Drumulator has an EPROM based OS, which was upgraded a few times during its product life. You can determine the OS version by pressing the MEM and CASS buttons together, the OS Rev will be displayed on the LED's. It can also be found by looking at the EPROM. It will have a version number like 830405.
OS Versions:
- 1.05: One of the original versions.
- 2.00: The version which introduced 64 songs.
- 3.00: The latest version.
Eight Voices There are a total of eight voice channels, through which the 12 drum samples are played.
Digital to Analog Converters There is only one digital to analog converter, which is a 6072 companding DAC. It is multiplexed to enable 8 separate voice channels to be heard, once demuxed.
Analog Filters Yes, the Drumulator has analog filters ! Two of the channels the ride and hit hats are unfiltered. Four others (snare/rim, bass,claps. cowbell/clave) are each filtered with a static five pole 1dB Chebyshev filter, set at frequencies to optimise the sounds. The remaining two channels (toms) each use a dynamic VCF. They use the SSM2044 with a simple AR envelope generated by the Z80. They create a 5ms sloping attack, followed by a decay. The filter cutoff frequencies can be internally adjusted.
Internal Mixer The eight voice channels are internally mixed into one, along withe the metronome.
Pad Programmer
Architecture The Pad Programmer is very simple technically. It consists of 4 independent trigger sensotos with appropriate circuitry within a common housing and power supply. The power supply is a simple three terminal regulator +5V supply. The input voltage can be anywhere from 8 and 25 VDC. The actual supplied wall unit was 10 VDC.
Sensors The sensors ar piezo-electric crystals mounted in a housing designed to transmit pressure from a vertical strike by a drum stick, and attentuate vibrations conducted by the housing. This assembly is glued togteher and tested at the factory. Service on these assemblies will generally be replacement, as repairs are difficult to accomplish and will frequently be unreliable.
The sensor produces a voltage spike of between 10 and 100 volts, which is loaded into a capacitor and resistor, and rectified by a full wave bridge. The resulting voltage is attentuated and applied to one terninal of a LM339 comparator. The other terminal of the comparator is adjusted for the desired sensitivity threshol. The trim is provided to minimise marginal switching. The comparator output triggers a one-shot which will swallow any comprator oscillation of multiple triggering, and provide suficient pulse width for the LED amplfier and for the output trigger pulse. Both of these signals are buffered from the one-shot output.
PCB Revisions The Revision 2 PCB was issued January 1984. The PCB has considerable space for additional electronics. ith the click channel. A single TL084 is used.
